Thursday, December 27, 2012

Adding old rustic charm to a newly built mudroom

Often in a new home or addition storage spaces take a back seat in design and color to the rest of the house.  Most of the time these small rooms have little to no color and the first inclination is to paint the built-in the same color as the trim. This young family wanted their custom millwork to draw attention, add charm, resemble a piece of furniture, withhold the wear and tears of two small boys and a busy family life while at the same time complimenting their love for antiques and all things old. 


Here is Mia my assistant and supervisor on the unfinished built-in.   I taped off all the walls and the floor using 3M blue painters tape. I prefer the one with the orange core. It is the best at preventing paint from bleeding under the tape.


I distressed the wood further by hammering the threads of a screw and using the back of the hammer to gouge the wood.

I wanted the built ins to look like they had been painted several times. In order to achieve that look I randomly painted red (Sherwin-Williams Red Bay 6321) and navy blue (Sherwin-Williams 6531 Indigo) undertones making sure that these colors pooled in the grooves and distressed areas. I then covered the two colors with a topcoat of 7610 Turkish Tile. It was important not to cover the the red and navy completely but to give it one light coat leaving brush stroke and areas where the under colors show through.  Basically, paint like you are in elementary school missing spots... and don't bother using a good quality brush. It's the inconsistancy and uneveness that give it charm.

After the top coat of Turkish Tile is dry I took a heavy grit sandpaper and sand the edges and certain areas of the built in to expose further the under colors and natural wood.


                                                                                                                          To protect and further give the paint depth I painted a dark blue almost black glaze.  I do this in small areas at a time. Wiping the glaze off in certain areas. This glaze stains the natural wood and creates yet another layer of color. As the glaze dries the brush strokes show. Below are details of multiple layers.


The tape is removed and the built- in is left to dry for at least 24-48 hours. Hooks found at Anthropologie are put up and the open spaces can accommodate wire or wicker baskets.


Saturday, September 8, 2012

Weekend Decorating Trash to Treasure painted Armoire


While cleaning out my mother's barn last weekend we came across this sad but cute armoire missing glass and in need of some repairs. Everyone thought that it should go in the donate/trash/sale pile but I had better plans for this beauty. I was in need for a new bookcase for my living room. Below are pictures of the armoire transformation from trash to treasure in very little time and for very little money. A weekend project that anyone can tackle with little effort. 

1. Remove doors and hardware. Save for future project or in case I ever want to change back to armoire. 

2. Clean out cobwebs and dust.


3. I knew that I wanted to add a small lamp onto one of the shelves so I raised the top shelf up to allow for the 15"' lamp.
I then drilled a hole in the right bottom for the plug.   I wanted to keep it's rustic feel so I did not fill in the screw holes with wood filler.


4. I painted the armoire a deep blue color with Home Depot's Behr Premium Plus Self-priming Interior Satin Enamel ( low odor and No VOC) Signature Blue UL240-22. Two coats covered perfect and enough of the quart was left over for future projects.

5. I distressed the edges by sanding with a rough grit sandpaper.


6. All finished and waited overnight before I filled the shelves. Although the paint may be dry to the touch in a few hours it is best to let dry overnight so that heavy objects don't stick and the primer/paint have time to cure.


Saturday, July 7, 2012

NY Yankees vs. Boston Red Sox murals

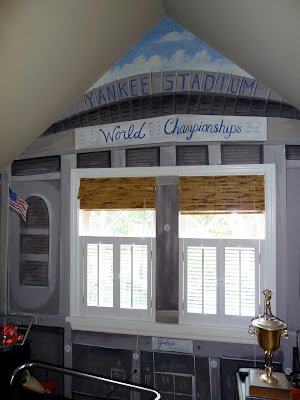
The New York Yankees or the Boston Red Sox?  Which one is better? Not for me to answer... But it is a close race between how many murals and sports related rooms I have requests for. So far there are more requests for a Yankee themed room here in Upstate NY. Here's a look at some of my favorite Yankee and Red Sox rooms. Feel free to weigh in your favorite....


Fenway Park including the Citco and John Hancock signs


The Green Monster


Yankee Stadium mural
A 2 minute tour of the biggest Yankee fans room.

Personalized detail billboard 
Locker and signature Yankee striped room 

detail of mitt


Derek Jeter jersey and Yankees logo
Yankee Stadium sign
Hockey/ baseball combo locker room


Monochromatic mural of Don Larsen's Perfect game with Yogi Berra catching.

The following photos are of a converted attic turned bedroom for two brothers. One A New York Fan and the other a Red Sox fan. So each got their own mural on their own side.


Yankee locker mural with duffle bag and signature white arches.

detail of dufflelbag
 

Wednesday, July 4, 2012

Is that really paint? Recreating the look of wallpaper.

A step by step look at the process....
Have you ever found the perfect wallpaper and later found out that it was discontinued? Settled on the perfect pattern but the color is not quite right? Like a certain part of a wall covering but want to alter the design or just plain can’t afford it? Well, there is a solution. It may not be the quickest method but you can achieve a one of a kind look that your guests will be double taking to make sure its not wallpaper. Here is a step by step method to help create the look of custom wallpaper.

This is the wallpaper that I will be recreating only without the two exterior pinstripes.
Measure out and paint stripes and beige pinstripe. These were done by hand per request of the homeowner for a more painterly look.


With an acetate plain stencil sheet that I purchased for Michael's craft store I traced the leaf motif with an extra fine tipped permanent marker.  I then carefully cut each shape out with an Exacto blade. Often, when a stencil is used several times the small pieces either break or detach. I made two sets of stencils since I'd be painting over 800 leaves!!

I then centered the stencil on the stripe and used a soft cream colored paint.  

I repeated stenciling all the stripes leaving the ones where the stencil came close to the wall, doorway or vanity. I  painted those last when I cut the stencil on left side so that it would lay flat on the wall near the corner. 

Some of the details in the leaf were lost during the stencil process so I go over and hand brush in with the green stripe color to add back the leaf's definition.

Prior to hand painting the center stripe I measured out the center and drew a line with a white colored pencil. The center line was also used as a guide so that my leaves stayed center all the way down the stripe.

Using the beige,  I hand paint the stems and veins of the leaves.
Detail of the finished product

Finished and ready to rehang mirror and art!


Additional images of wallpaper reproduction.......